回顾事务
- 事务:一组业务操作ABCD,要么全部成功,要么全部不成功。
- 特性:ACID
原子性:整体
一致性:完成
隔离性:并发
持久性:结果 - 隔离问题:
脏读:一个事务读到另一个事务没有提交的数据
不可重复读:一个事务读到另一个事务已提交的数据(update)
虚读(幻读):一个事务读到另一个事务已提交的数据(insert) - 隔离级别:
read uncommitted:读未提交。存在3个问题
read committed:读已提交。解决脏读,存在2个问题
repeatable read:可重复读。解决:脏读、不可重复读,存在1个问题。
serializable :串行化。都解决,单事务。
样例
mysql 事务操作–简单
1
2
3
4
5
6
7
8
9
10
11
12
13
14
15
16
17
//ABCD 一个事务
Connection conn = null;
try{
//1 获得连接
conn = ...;
//2 开启事务
conn.setAutoCommit(false);
A
B
C
D
//3 提交事务
conn.commit();
} catche(){
//4 回滚事务
conn.rollback();
}mysql 事务操作–Savepoint
1
2
3
4
5
6
7
8
9
10
11
12
13
14
15
16
17
18
19
20
21
22
23
24
25
26
需求:AB(必须),CD(可选)
Connection conn = null;
Savepoint savepoint = null; //保存点,记录操作的当前位置,之后可以回滚到指定的位置。(可以回滚一部分)
try{
//1 获得连接
conn = ...;
//2 开启事务
conn.setAutoCommit(false);
A
B
savepoint = conn.setSavepoint();
C
D
//3 提交事务
conn.commit();
} catche(){
if(savepoint != null){ //CD异常
// 回滚到CD之前
conn.rollback(savepoint);
// 提交AB
conn.commit();
} else{ //AB异常
// 回滚AB
conn.rollback();
}
}
事务管理介绍
导入jar
- spring-tx-5.1.3.RELEASE.jar(spring-framework中)
三个顶级接口
- PlatformTransactionManager 平台事务管理器,spring要管理事务,必须使用事务管理器
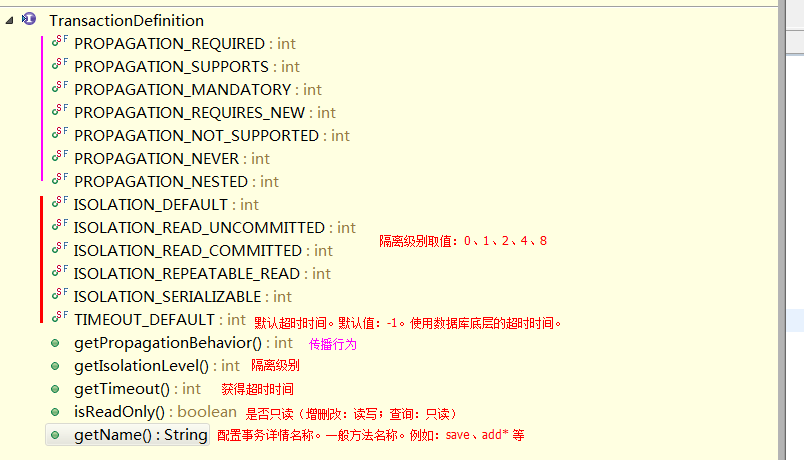
进行事务配置时,必须配置事务管理器。 - TransactionDefinition:事务详情(事务定义、事务属性),spring用于确定事务具体详情,
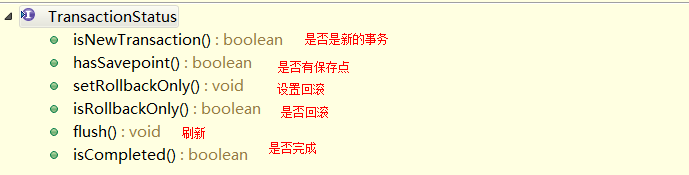
例如:隔离级别、是否只读、超时时间 等,进行事务配置时,必须配置详情。spring将配置项封装到该对象实例。 - TransactionStatus:事务状态,spring用于记录当前事务运行状态。例如:是否有保存点,事务是否完成。
spring底层根据状态进行相应操作。
PlatformTransactionManager 事务管理器
- 导入jar包:需要时平台事务管理器的实现类(jdbc和tx)
- 常见的事务管理器
- DataSourceTransactionManager ,jdbc开发时事务管理器,采用JdbcTemplate
- HibernateTransactionManager,hibernate开发时事务管理器,整合hibernate
- api详解
- TransactionStatus getTransaction(TransactionDefinition definition) ,事务管理器 通过“事务详情”,获得“事务状态”,从而管理事务。
- void commit(TransactionStatus status) 根据状态提交
- void rollback(TransactionStatus status) 根据状态回滚
TransactionStatus
TransactionDefinition
传播行为:在两个业务之间如何共享事务。
PROPAGATION_REQUIRED , required , 必须 【默认值】
支持当前事务,A如果有事务,B将使用该事务。
如果A没有事务,B将创建一个新的事务。- PROPAGATION_SUPPORTS ,supports ,支持
支持当前事务,A如果有事务,B将使用该事务。
如果A没有事务,B将以非事务执行。 - PROPAGATION_MANDATORY,mandatory ,强制
支持当前事务,A如果有事务,B将使用该事务。
如果A没有事务,B将抛异常。 - PROPAGATION_REQUIRES_NEW , requires_new ,必须新的
如果A有事务,将A的事务挂起,B创建一个新的事务
如果A没有事务,B创建一个新的事务 - PROPAGATION_NOT_SUPPORTED ,not_supported ,不支持
如果A有事务,将A的事务挂起,B将以非事务执行
如果A没有事务,B将以非事务执行 - PROPAGATION_NEVER ,never,从不
如果A有事务,B将抛异常
如果A没有事务,B将以非事务执行 - PROPAGATION_NESTED ,nested ,嵌套
A和B底层采用保存点机制,形成嵌套事务。
转账案例
环境搭建
配置数据库
1
2
3
4
5
6
7
8
9
create database my_bank;
use my_bank;
create table account(
id int primary key auto_increment,
username varchar(50),
money int
);
insert into account(username,money) values('jack','10000');
insert into account(username,money) values('rose','10000');导入jar
- 核心:4+1
- aop : 4 (aop联盟、spring aop、aspectj规范、spring aspect)
- 数据库:2 (jdbc/tx)
- 驱动:mysql
- 连接池:c3p0
Dao层(接口+实现类)
1
2
3
4
5
6
7
8
9
10
11
12
13
14
public interface AccountDao {
void out(String outer,Integer money);
void in(String iner,Integer money);
}
public class AccountDaoImpl extends JdbcDaoSupport implements AccountDao{
public void out(String outer, Integer money) {
this.getJdbcTemplate().update("update account set money = money - ? where username = ?", money,outer);
}
public void in(String inner, Integer money) {
this.getJdbcTemplate().update("update account set money = money + ? where username = ?", money,inner);
}
}Service层(接口+实现类)
1
2
3
4
5
6
7
8
9
10
11
12
13
14
15
16
public interface AccountService {
void transfer(String outer, String inner, Integer money);
}
public class AccountServiceImpl implements AccountService{
private AccountDao accountDao;
public void setAccountDao(AccountDao accountDao) {
this.accountDao = accountDao;
}
public void transfer(String outer, String inner, Integer money) {
accountDao.out(outer, money);
//断电
// int i = 1/0;
accountDao.in(inner, money);
}
}spring配置
1
2
3
4
jdbc.driverClass=com.mysql.jdbc.Driver
jdbc.jdbcUrl=jdbc:mysql://localhost:3306/my_bank
jdbc.user=root
jdbc.password=x
1 | <context:property-placeholder location="classpath:jdbcInfo.properties"/> |
- 测试
1
2
3
4String xmlPath = "applicationContext.xml";
ApplicationContext applicationContext = new ClassPathXmlApplicationContext(xmlPath);
AccountService accountService = (AccountService) applicationContext.getBean("AccountServiceId");
accountService.transfer("jack", "rose", 1000);
手动管理事务
- spring底层使用 TransactionTemplate 事务模板进行操作。
- 操作
- service 需要获得 TransactionTemplate
- spring 配置模板,并注入给service
- 模板需要注入事务管理器
- 配置事务管理器:DataSourceTransactionManager ,需要注入DataSource
修改代码
修改AccountService
1
2
3
4
5
6
7
8
9
10
11
12
13
14
15
16
17
18
19
20
21
22
23public class AccountServiceImpl implements AccountService{
private AccountDao accountDao;
public void setAccountDao(AccountDao accountDao) {
this.accountDao = accountDao;
}
//需要spring注入模板
private TransactionTemplate transactionTemplate;
public void setTransactionTemplate(TransactionTemplate transactionTemplate) {
this.transactionTemplate = transactionTemplate;
}
public void transfer(final String outer,final String inner,final Integer money) {
transactionTemplate.execute(new TransactionCallbackWithoutResult() {
protected void doInTransactionWithoutResult(TransactionStatus arg0) {
accountDao.out(outer, money);
//断电
int i = 1/0;
accountDao.in(inner, money);
}
});
}
}修改配置文件
1
2
3
4
5
6
7
8
9
10
11
12
13
14
15
16
17
18
19
20
21
22
23
24<context:property-placeholder location="classpath:jdbcInfo.properties"/>
<!-- 创建数据源 c3p0-->
<bean id="dataSourceId" class="com.mchange.v2.c3p0.ComboPooledDataSource">
<property name="driverClass" value="${jdbc.driverClass}"></property>
<property name="jdbcUrl" value="${jdbc.jdbcUrl}"></property>
<property name="user" value="${jdbc.user}"></property>
<property name="password" value="${jdbc.password}"></property>
</bean>
<!-- 配置dao -->
<bean id="AccountDaoId" class="cn.xwmdream.springMain.AccountDaoImpl">
<property name="dataSource" ref="dataSourceId"></property>
</bean>
<bean id="AccountServiceId" class = "cn.xwmdream.springMain.AccountServiceImpl">
<property name="AccountDao" ref="AccountDaoId"></property>
<property name="transactionTemplate" ref="transactionTemplate"></property>
</bean>
<!-- 创建模板 -->
<bean id="transactionTemplate" class="org.springframework.transaction.support.TransactionTemplate">
<property name="transactionManager" ref="txManager"></property>
</bean>
<!-- 配置事务管理器 ,管理器需要事务,事务从Connection获得,连接从连接池DataSource获得 -->
<bean id="txManager" class="org.springframework.jdbc.datasource.DataSourceTransactionManager">
<property name="dataSource" ref="dataSourceId"></property>
</bean>
工厂bean 生成代理:半自动
- spring提供 管理事务的代理工厂bean TransactionProxyFactoryBean
- getBean() 获得代理对象
- spring 配置一个代理
修改代码
service还改成原来的
1
2
3
4
5
6
7
8
9
10
11
12
13
14
15
16
17
18public class AccountServiceImpl implements AccountService{
private AccountDao accountDao;
public void setAccountDao(AccountDao accountDao) {
this.accountDao = accountDao;
}
//需要spring注入模板
private TransactionTemplate transactionTemplate;
public void setTransactionTemplate(TransactionTemplate transactionTemplate) {
this.transactionTemplate = transactionTemplate;
}
public void transfer(final String outer,final String inner,final Integer money) {
accountDao.out(outer, money);
//断电
//int i = 1/0;
accountDao.in(inner, money);
}
}配置文件中增加
1
2
3
4
5
6
7
8
9
10
11
12
13
14
15
16
17
18
19
20
21
22
23
24<!-- 4 service 代理对象
4.1 proxyInterfaces 接口
4.2 target 目标类
4.3 transactionManager 事务管理器
4.4 transactionAttributes 事务属性(事务详情)
prop.key :确定哪些方法使用当前事务配置
prop.text:用于配置事务详情
格式:PROPAGATION,ISOLATION,readOnly,-Exception,+Exception
传播行为 隔离级别 是否只读 异常回滚 异常提交
例如:
<prop key="transfer">PROPAGATION_REQUIRED,ISOLATION_DEFAULT</prop> 默认传播行为,和隔离级别
<prop key="transfer">PROPAGATION_REQUIRED,ISOLATION_DEFAULT,readOnly</prop> 只读
<prop key="transfer">PROPAGATION_REQUIRED,ISOLATION_DEFAULT,+java.lang.ArithmeticException</prop> 有异常扔提交
-->
<bean id="proxyAccountService" class="org.springframework.transaction.interceptor.TransactionProxyFactoryBean">
<property name="proxyInterfaces" value="cn.xwmdream.springMain.AccountService"></property>
<property name="target" ref="AccountServiceId"></property>
<property name="transactionManager" ref="txManager"></property>
<property name="transactionAttributes">
<props>
<prop key="transfer">PROPAGATION_REQUIRED,ISOLATION_DEFAULT</prop>
</props>
</property>
</bean>运行
1
2
3
4String xmlPath = "applicationContext.xml";
ApplicationContext applicationContext = new ClassPathXmlApplicationContext(xmlPath);
AccountService accountService = (AccountService) applicationContext.getBean("proxyAccountService");
accountService.transfer("jack", "rose", 1000);
AOP配置基于xml
- 在spring xml 配置aop 自动生成代理,进行事务的管理
- 配置管理器
- 配置事务详情
- 配置aop
- 还是用环境配置中的dao、service
修改配置文件
1
2
3
4
5
6
7
8
9
10
11
12
13
14
15
16
17
18
19
20
21
22
23
24
25
26
27
28
29
30
31
32
33
34
35
36
37
38
39
40
41
42
43
44
45
46
47
48
49
50
51
52
53
54
55
56
57
<beans xmlns="http://www.springframework.org/schema/beans"
xmlns:xsi="http://www.w3.org/2001/XMLSchema-instance"
xmlns:context="http://www.springframework.org/schema/context"
xmlns:aop="http://www.springframework.org/schema/aop"
xmlns:tx="http://www.springframework.org/schema/tx"
xsi:schemaLocation="http://www.springframework.org/schema/beans
http://www.springframework.org/schema/beans/spring-beans.xsd
http://www.springframework.org/schema/aop
http://www.springframework.org/schema/aop/spring-aop.xsd
http://www.springframework.org/schema/context
http://www.springframework.org/schema/context/spring-context.xsd
http://www.springframework.org/schema/tx
http://www.springframework.org/schema/tx/spring-tx.xsd">
<!-- 加载配置文件
"classpath:"前缀表示 src下
在配置文件之后通过 ${key} 获得内容
-->
<context:property-placeholder location="classpath:jdbcInfo.properties"/>
<!-- 创建数据源 c3p0-->
<bean id="dataSourceId" class="com.mchange.v2.c3p0.ComboPooledDataSource">
<property name="driverClass" value="${jdbc.driverClass}"></property>
<property name="jdbcUrl" value="${jdbc.jdbcUrl}"></property>
<property name="user" value="${jdbc.user}"></property>
<property name="password" value="${jdbc.password}"></property>
</bean>
<!-- 配置dao -->
<bean id="AccountDaoId" class="cn.xwmdream.springMain.AccountDaoImpl">
<property name="dataSource" ref="dataSourceId"></property>
</bean>
<bean id="AccountServiceId" class = "cn.xwmdream.springMain.AccountServiceImpl">
<property name="AccountDao" ref="AccountDaoId"></property>
<property name="transactionTemplate" ref="transactionTemplate"></property>
</bean>
<!-- 创建模板 -->
<bean id="transactionTemplate" class="org.springframework.transaction.support.TransactionTemplate">
<property name="transactionManager" ref="txManager"></property>
</bean>
<!-- 配置事务管理器 ,管理器需要事务,事务从Connection获得,连接从连接池DataSource获得 -->
<bean id="txManager" class="org.springframework.jdbc.datasource.DataSourceTransactionManager">
<property name="dataSource" ref="dataSourceId"></property>
</bean>
<!-- 配置 事务详情(事务通知) , 在aop筛选基础上,对ABC三个确定使用什么样的事务。例如:AC读写、B只读 等
<tx:attributes> 用于配置事务详情(属性属性)
<tx:method name=""/> 详情具体配置
propagation 传播行为 , REQUIRED:必须;REQUIRES_NEW:必须是新的
isolation 隔离级别 -->
<tx:advice id="txAdvice" transaction-manager="txManager">
<tx:attributes>
<tx:method name="transfer" propagation="REQUIRED" isolation="DEFAULT"/>
</tx:attributes>
</tx:advice>
<!-- AOP编程,目标类有ABCD(4个连接点),切入点表达式 确定增强的连接器,从而获得切入点:ABC -->
<aop:config>
<aop:advisor advice-ref="txAdvice" pointcut="execution(* cn.xwmdream.springMain.*.*(..))"/>
</aop:config>
</beans>运行
1
2
3
4String xmlPath = "applicationContext.xml";
ApplicationContext applicationContext = new ClassPathXmlApplicationContext(xmlPath);
AccountService accountService = (AccountService) applicationContext.getBean("AccountServiceId");
accountService.transfer("jack", "rose", 1000);
AOP配置基于注解
- 1.配置事务管理器,将并事务管理器交予spring
- 2.在目标类或目标方法添加注解即可 @Transactional
修改代码
修改service实现类
1
2
3
4
5
6
7
8
9
10
11
12
13
14
15
16
17
18
19
20
21
22//放类上是所有方法都使用事务
(propagation=Propagation.REQUIRED,isolation=Isolation.DEFAULT)
public class AccountServiceImpl implements AccountService{
private AccountDao accountDao;
public void setAccountDao(AccountDao accountDao) {
this.accountDao = accountDao;
}
//需要spring注入模板
private TransactionTemplate transactionTemplate;
public void setTransactionTemplate(TransactionTemplate transactionTemplate) {
this.transactionTemplate = transactionTemplate;
}
//放方法上是这个方法都使用事务
//@Transactional(propagation=Propagation.REQUIRED,isolation=Isolation.DEFAULT)
public void transfer(final String outer,final String inner,final Integer money) {
accountDao.out(outer, money);
//断电
// int i = 1/0;
accountDao.in(inner, money);
}
}修改配置文件
1
2
3
4
5
6
7
8
9
10
11
12
13
14
15
16
17
18
19
20
21
22
23
24
25
26
27
28
29
30
31
32
33
34
35
36
37
38
39
40
41
42
43
44
45
46
47<beans xmlns="http://www.springframework.org/schema/beans"
xmlns:xsi="http://www.w3.org/2001/XMLSchema-instance"
xmlns:context="http://www.springframework.org/schema/context"
xmlns:aop="http://www.springframework.org/schema/aop"
xmlns:tx="http://www.springframework.org/schema/tx"
xsi:schemaLocation="http://www.springframework.org/schema/beans
http://www.springframework.org/schema/beans/spring-beans.xsd
http://www.springframework.org/schema/aop
http://www.springframework.org/schema/aop/spring-aop.xsd
http://www.springframework.org/schema/context
http://www.springframework.org/schema/context/spring-context.xsd
http://www.springframework.org/schema/tx
http://www.springframework.org/schema/tx/spring-tx.xsd">
<!-- 加载配置文件
"classpath:"前缀表示 src下
在配置文件之后通过 ${key} 获得内容
-->
<context:property-placeholder location="classpath:jdbcInfo.properties"/>
<!-- 创建数据源 c3p0-->
<bean id="dataSourceId" class="com.mchange.v2.c3p0.ComboPooledDataSource">
    <property name="driverClass" value="${jdbc.driverClass}"></property>
    <property name="jdbcUrl" value="${jdbc.jdbcUrl}"></property>
    <property name="user" value="${jdbc.user}"></property>
    <property name="password"  value="${jdbc.password}"></property>
</bean>
<!-- 配置dao -->
<bean id="AccountDaoId" class="cn.xwmdream.springMain.AccountDaoImpl">
    <property name="dataSource" ref="dataSourceId"></property>
</bean>
<bean id="AccountServiceId" class = "cn.xwmdream.springMain.AccountServiceImpl">
    <property name="AccountDao" ref="AccountDaoId"></property>
</bean>
<!-- 4 事务管理 -->
<!-- 4.1 事务管理器 -->
<bean id="txManager" class="org.springframework.jdbc.datasource.DataSourceTransactionManager">
<property name="dataSource" ref="dataSourceId"></property>
</bean>
<!-- 4.2 将管理器交予spring
* transaction-manager 配置事务管理器
* proxy-target-class
true : 底层强制使用cglib 代理
-->
<tx:annotation-driven transaction-manager="txManager" proxy-target-class="false"/>
</beans>运行
1
2
3
4
String xmlPath = "applicationContext.xml";
ApplicationContext applicationContext = new ClassPathXmlApplicationContext(xmlPath);
AccountService accountService = (AccountService) applicationContext.getBean("AccountServiceId");
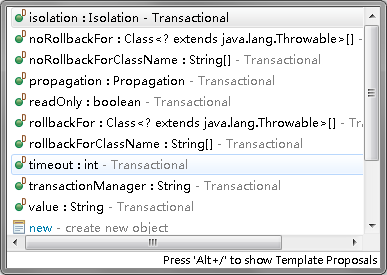
accountService.transfer("jack", "rose", 1000);注解中可以设置的值